

Why do some polished concrete floors look cloudy instead of clear?

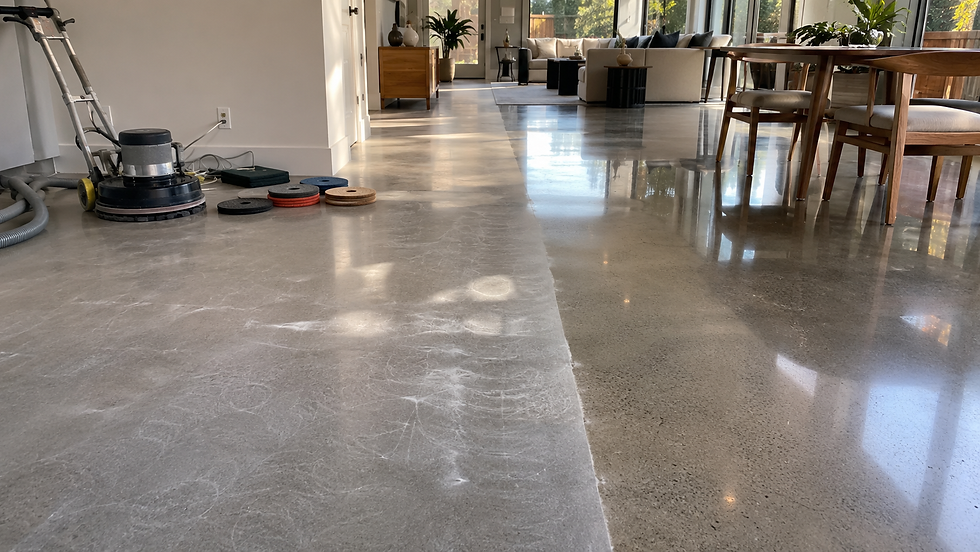
A cloudy polished concrete floor reflects light through scratches, residue, uneven surface density, or a thin maintenance film. The floor might still look shiny under ceiling lights, yet reflected objects appear blurry. Shine alone does not prove proper refinement.
Haze present on day one often points toward incomplete diamond refinement, skipped stages, dirty slurry, or poor densifier control. Haze appearing later often points toward cleaner buildup, wax, chemical etching, traffic wear, moisture, or a topical coating.
Do not add more sealer, wax, or shine restorer before identifying the floor system. A wrong product often hides the symptom for a short period, then makes repair harder.
Why Does a Polished Floor Look Shiny but Still Cloudy?
Polished concrete clarity depends on how light leaves the surface. A well-refined floor returns a sharp reflection. Microscopic scratches, dried residue, or uneven film thickness scatter light in several directions. The result looks cloudy even when a gloss meter records strong reflection.
The Concrete Polishing Council appearance chart separates gloss, haze, and distinctness of image, often called DOI. Gloss measures reflected light. DOI measures reflection sharpness. Haze measures scattered light around the reflected image. These readings answer different questions.
Gloss, Haze, and DOI Measure Different Results
Inspect reflections from windows, door frames, lights, and equipment. Blurry edges often expose poor DOI faster than a straight overhead view. A high-speed burnisher might raise gloss while deep scratches remain. The floor then looks brighter, but not clearer.
Satin Finish Versus Defective Haze
An intentional satin finish stays even and clean without mirror-like reflection. Defective haze looks streaked, milky, smeared, or patchy. Tool paths often appear under side lighting.
Uniformity matters more than maximum shine. A lower-sheen floor with stable clarity often represents better work than a glossy floor with blurred reflections.
How Do Improper Refinement and Skipped Grits Create Cloudiness?
Diamond polishing works through controlled scratch replacement. A coarse abrasive removes weak paste, coatings, or surface damage. Each finer abrasive must remove the scratch pattern left by the prior stage.
A project might begin with 30- or 40-grit metal-bond diamonds, move through 80 and 150 metal or transitional tooling, then continue with 100, 200, 400, 800, 1500, or 3000 resin-bond diamonds. The exact sequence depends on slab hardness, aggregate exposure, tooling, and the requested finish.
Skipping a printed grit number is not always the failure. Moving forward before complete scratch removal is the failure. An 800-grit pass does not erase deep 80-grit scratches. It polishes their edges and leaves a bright but blurry surface.
Heavenly Touch approaches professional concrete polishing as a measured refinement process, not a race toward the highest grit.
Mohs Hardness and Tool Selection Matter
A technician often checks surface hardness with scratch picks based on the Mohs scale, which ranks relative hardness from 1 to 10. Soft cement paste, dense hard-troweled sections, and exposed aggregate respond differently to the same diamond bond.
Cross-hatch passes made in alternating directions help expose scratches left from the prior direction. Edges, patches, and open slab areas often need different pacing.
Dirty Slurry Creates New Scratches
Wet slurry contains cement fines, aggregate fragments, metal residue, and worn diamond particles. One coarse particle left during a fine resin pass keeps cutting after the crew moves to a higher grit.
Random swirls and cloudy islands often point toward contamination. Slurry recovery, rinsing, vacuuming, and tooling inspection belong inside the polishing process.
How Do Densifier Timing and Burnishing Leave Haze?
Concrete densifier reacts within open pores and strengthens cement paste. It should not form a thick surface coating. Poor timing, uneven absorption, excess product, and dried puddles often leave white deposits or a cloudy film.
One current W.R. Meadows lithium-silicate data sheet calls for a 5- to 10-minute wet period, excess removal, 1 to 2 hours of drying, and restricted foot traffic for at least 4 hours, with 12 hours preferred. It also specifies burnishing at 2,000 to 2,200 rpm when burnishing forms part of the system. Those figures apply to one product, not every densifier.
Poor Densifier Control Leaves Residue
Problems start when the slab receives more product than its pores accept. Puddles dry into salts. Dust left on the floor becomes bonded into the surface. Uneven porosity creates light and dark sections.
Sika guidance directs installers to remove grinding dust before densifier application. Its product sheets also warn against dried puddles and list 7 days as a minimum slab age, with 28 days preferred for some systems.
Burnishing Does Not Repair Deep Scratches
Burnishing refines a clean, sound finish and an evenly applied guard. A loaded pad, excessive guard, or dirty floor leaves streaks. Fast burnishing might improve shine while deep grinder paths remain.
When those paths stay visible, corrective polishing must return to the grit level responsible for the defect.
How Do Maintenance Products Create a Cloudy Film?
A polished floor often leaves the contractor clear and turns cloudy months later. Cleaning history then becomes the first diagnostic step.
Soap, floor finish, wax, oily degreaser, dirty mop water, and auto-scrubber residue build thin layers. Each layer catches dust and scatters light. Repeated applications create a gray or milky appearance, especially in low-traffic areas.
South Bay water also leaves mineral deposits when rinse water dries on the slab. A single “San Jose moisture PPM” threshold does not exist for polished concrete. PPM readings usually refer to dissolved material, product chemistry, or meter-specific output. Slab moisture diagnosis relies on recognized test methods and the finish manufacturer’s limits.
For more care guidance, review the Heavenly Touch concrete floor care FAQs.
Use a Neutral Cleaner and Control the Dose
Select a pH-neutral cleaner approved for polished concrete. Measure the dilution. Recover dirty solution before it dries. Rinse when the product label calls for rinsing.
More chemical does not mean more cleaning. Overdosing leaves residue. Dirty mop water spreads soil instead of removing it. Entrance grit then scratches the contaminated film and creates dull traffic lanes.
Stop Applying Products Before Identification
Avoid vinegar, citrus degreaser, generic wax, wet-look restorer, acid wash, and another sealer over an unknown film. Acid attacks cement paste. Wax changes maintenance requirements.
A controlled cleaning test gives useful evidence. If haze softens, smears, or lifts, residue is likely. If grinder lines remain under side lighting, the defect sits deeper.
How Do Moisture, Coatings, and Slab Differences Affect Clarity?
Not every shiny concrete floor is mechanically polished. Some floors are grind-and-seal systems. Others use epoxy, polyaspartic, urethane, or a topical guard.
Mechanically polished concrete gains clarity through diamond refinement inside the surface. Grind-and-seal gains appearance from a film-forming sealer. A coating failure therefore needs a different repair from a refinement failure.
Review Heavenly Touch epoxy floor coatings for the difference between resin systems and polished concrete.
Floor system | Finish source | Common cloudy appearance |
Mechanically polished concrete | Progressive diamond refinement | Scratches, slurry contamination, uneven density |
Grind-and-seal | Topical sealer | Whitening, overapplication, trapped moisture |
Epoxy or polyaspartic | Resin coating | Cure defects, moisture pressure, adhesion loss |
Moisture Testing Uses RH and Emission Methods
The International Concrete Repair Institute identifies ASTM F2170 in-slab relative humidity, ASTM F1869 moisture-vapor emission, ASTM F2659 comparative meter testing, and related methods for slab evaluation. No single PPM reading replaces this work.
Manufacturer limits control coating approval. Surface meter readings help locate patterns, but they do not replace in-slab testing where trapped moisture or coating failure is suspected.
South Bay Slabs Often Contain Density Changes
Older South Bay garages and commercial floors often include hand-troweled edges, machine-troweled fields, control joints, patches, tenant-improvement cuts, and unknown vapor protection.
Deeper grinding might reduce one visual difference while exposing larger aggregate and changing the finish. When a coating needs replacement, product selection should also account for Bay Area architectural coating rules.
How Should a Cloudy Floor Be Diagnosed and Repaired?
Start with timing. Haze present immediately after polishing points toward refinement, slurry, densifier, or burnishing. Haze appearing after a cleaner change points toward residue or chemical damage. Milky areas during damp periods raise concern about a topical film and moisture.
Pattern also matters. Machine lines point toward tooling. Random swirls point toward contamination. White crust near joints points toward moisture movement or salts. Different clarity around patches points toward density variation.
What you see | Likely cause | First step |
Film smears when rubbed | Cleaner or wax residue | Controlled cleaning test |
Lines follow machine travel | Incomplete refinement | Inspect under side lighting |
Random circular scratches | Slurry contamination | Evaluate corrective resin stages |
White residue near joints | Moisture or salts | Test and trace the source |
Milky film below a coating | Sealer whitening | Identify the coating |
High gloss with blurry reflection | Poor DOI or buildup | Assess clarity, not shine alone |
A Professional Assessment Follows a Sequence
The inspection should identify the floor system, cleaning history, scratch direction, coating presence, joint condition, surface hardness, and aggregate exposure.
A technician should inspect under raking light, perform a controlled cleaning test, and test moisture when symptoms support it. The repair proposal should explain any permanent appearance change from deeper grinding.
Heavenly Touch Stone Care serves San Jose and the South Bay with concrete restoration and specialty floor services.
Choose the Least Invasive Effective Repair
Possible repairs include professional cleaning, residue removal, reburnishing, selected resin refinement, a return to lower grits, coating removal, or moisture correction before recoating.
More grinding is not always better. It changes aggregate exposure, color balance, and edge appearance. The best plan fixes the identified cause while preserving as much of the existing floor as possible.
Conclusion: Heavenly Touch Stone Care evaluates residential and commercial floors across San Jose and the South Bay.

A cloudy floor needs diagnosis, not another shine product.
Shine without sharp reflection points toward poor DOI, micro-scratches, residue, or uneven surface conditions. Lines and swirls often trace back to refinement or slurry. White film might come from densifier, cleaning chemistry, mineral residue, moisture, or a topical sealer. Slab patches and hand-finished edges also create differences no cleaner will remove.
The repair should match the cause. Light residue might need professional cleaning. A sound floor with minor wear might need reburnishing. Deep scratches often require a return to an earlier diamond stage. Coating haze needs coating identification and moisture review before removal or replacement.
A professional review also prevents unnecessary grinding, protects aggregate exposure, and gives you a clear repair scope before work starts.
Heavenly Touch Stone Care evaluates residential and commercial floors across San Jose and the South Bay. Schedule a Polished Concrete Clarity Assessment before adding another product or grinding deeper.
Frequently Asked Questions
Why did my polished concrete floor turn hazy?
Common causes include incomplete refinement, dirty slurry, dried densifier, cleaner film, wax, traffic wear, moisture, and uneven slab density. The timing and visible pattern usually narrow the cause.
Why does the floor look cloudy after sealing?
A topical sealer might whiten from excess thickness, contamination, trapped moisture, or poor adhesion. First identify the coating before applying solvent, stripper, or another sealer.
Does Repolishing Fix a Cloudy Floor?
Repolishing works when scratches or incomplete refinement caused the haze. Residue, moisture, or coating failure needs a different first step.
How Do I Separate Cleaner Residue From a Polishing Defect?
Residue often smears, lifts, or changes during a controlled cleaning test. Refinement defects tend to follow machine paths and remain visible under low side lighting.
Does Concrete Densifier Leave White Residue?
Excess densifier left to dry might form white salts or haze. Proper application controls coverage, wet time, absorption, excess removal, drying, and burnishing.


Comments